
Rig - Computer CW Interface Options
 We've added CW sending features, including real time keyboard, pre-programmed strings and wild cards to all of the logging programs. You can key your rig via direct USB connection (for radios that support it), Winkeyer (CW timed by the Winkeyer device), W2ENY's USB CW Cable (CW timed by your PC's processor) or build an interface as detailed below (for RTS / DTR keying), that connects to your rig's straight key jack. If you need a USB to serial adapter to connect your keying hardware, they are available at stores like your local Best Buy.
The processor timed CW section below is for radios that still require a hardware device that connects from your PC to the straight key jack of your rig to send CW. Newer radios, including the Icom 7610, Icom 7300, Flex and likely others, that are designed to interface directly via a USB cable to your PC, can be keyed directly from N3FJP Software without any other interface hardware whatsoever! For example, with the 7610, select Menu > Set > Connectors > USB Send Keying > USB Keying (CW) > DTR. Then, in N3FJP, click Settings > Transmit > CW, select the DTR keying option and the port for your Icom. That's it! Flex users, please see below.
If your rig supports it, you can also send CW using only your rig interface connection, that is timed by your rig! Please see the Rig Interface (RI) section below.
Winkeyer / Processor Timed CW Setup Steps
To use computer generated CW, first you will have to build or purchase an interface to connect from your computer's serial port to your transmitter. If you would like to build your own interface, we have schematics below.
Most folks only have USB ports now, but in most cases a USB to serial adapter will work fine. You'll find them on line or at your local Best Buy.
Alternatively, you can select the Winkeyer device, which will key your rig independently from your PC's processor, which is a great solution if your processor's code is erratic. There is also a Winkeyer USB version that will connect right to your PC's USB port.
Choose the com port that you have your keying device connected to. Please note that our software does not share ports with other programs, or even different functions within this one. For example, if you are using Com 1 for rig interface, you'll need to select a different port to send CW.
Connect your CW interface to your PC and to the Straight Key jack of your rig. Do not connect to your rig's automatic keyer jack.
From the Keying Options, select which line to key the transmitter.
Now that the interface is hooked up you can test the setup. Click the Test command button to send the text in the F9 text box.
The program will not generate a side tone so make sure your transceiver is set to produce one. Also, make sure you are on a clear frequency because if all goes well, you will be transmitting.
For Processor Timed CW Best Performance
If you are using processor timed CW (not Winkeyer), from the Timing Options, experiment with all three. They each take a different approach to processor timing and you'll likely find one more consistent on your PC than another. For the most precise timing, do not run any other programs, virus software etc., while transmitting.
We've had good reports from lots of folks on processor timed CW from this software and it is working great here with my FTDI, USB to serial adapter, but on some systems, the timing is either erratic or can not attain higher speeds. This may be the result of multitasking, an incompatible Windows driver or inferior USB to serial adapter. If your processor generated CW is not satisfactory, Winkeyer is a great solution.
Enter the WPM code speed and any adjustments to the standard word spacing (0 is standard).
At the bottom left of the CW setup form, there is an option to enable faster termination of CW when pressing the Esc key from the main form. This may or may not otherwise affect the overall CW timing on your system. The Esc check termination rate is also dependent on the timing option you select.
The text in the F1 field will continue to loop, pausing for the number of seconds between loops based on the numeric value you enter in the small field beside it.
The CW PTT for Amps feature is used to keep the relays on some types of linear amplifiers from keying with every dit or dah. With this feature enabled, if you are using RTS to key the actual CW dits and dahs, then DTR will remain in a key down state until the CW buffer completes, or vice versa. You'll need to configure the cabling for your amplifier.
Sending CW from Main Form
With your rig in CW mode and CW mode displaying in the software, to send an F key string, just press the associated F key from the main form. Be sure that your keyboard has a standard configuration, as some manufacturers remap the F keys for other functions, which may require your reset.
You can adjust your speed on the main form by using the Up / Down arrows. Note - if you are using Winkeyer, using the up / down arrows will disable the Winkeyer Speed Pot Lock.
To send a CW loop, such as calling CQ, enter the value you wish to loop, such as TEST W1AW, in the F1 field. To the right of the F1 field, enter the delay in seconds. Pressing any key from the main form will disable the F1 loop, so as you start to type the call of the calling station, the loop will automatically stop for you.
To stop sending CW, from the main form, press Esc. In addition, for the F1 loop, pressing any key on the main form will stop the F1 sending loop (so you can start entering a call as soon as you hear the reply to your CQ).
To enable the Tab Sends Message (TSM) option, press Ctrl + Shift + G from the main form. With TSM enabled, when you tab from the Call field, the F2 string will be sent. When you press enter, the F3 string will be sent.
To send keyboard CW from the main form, press F12. Then type and your characters will be sent as you type. Press F12 again to exit CW keyboard mode.
You can also press Ctrl K from the main form to type the CW you want to send in a buffer, which will be held until you press enter.
You can display a small, Mini form to remind you of your F key strings by pressing Ctrl > Shift W from the main form. You can also set the Mini form to display on startup automatically by selecting the Show Mini on Startup checkbox at the lower left.
Clicking on the command buttons on the Mini form will also send the associated F key strings. Please note that with Winkeyer, clicking the Mini form F1 button will not enable the F1 loop and the automatic log contact ! symbol isn't enabled from the Mini form at this time.
Wild Cards
Wildcards that you can insert in your string are:
$ for Call (Sends main form Call field value)
* for RST (sends RST value or 5NN if blank)
# for the next consecutive Serial Number (where applicable).
% for current county abbreviation (state QSO Party programs only).
The ! character anywhere in the string will enter the contact in your log automatically after sending completes.
Other special characters are as follows:
: KN
< AR
= BT
> SK
@ AS
[ QRZ
] QSL
^ 8 dit error
( Faster by 2 WPM (can be grouped)
) Slower by 2 WPM (can be grouped)
Winkeyer characters include _ to merge characters (to create prosigns) and | to add a small amount of space between characters.
Rig Interface RI: to Send CW
If your rig supports it, once your have rig interface enabled (Settings > Rig Interface), you can send CW directly from your rig without any other connection! To send CW via your rig (for rigs equipped with this feature), precede the text with RI: and then the commands for your specific rig. For example, when placed in an F key string on the CW setup form, the following will trigger the Icom 7300 and Icom 7610 (you must have rig interface enabled and be connected by a com port). If your rig requires the text to be converted to hex, enclose it in brackets.
Using the RI: method with rigs like the Icom 7610 and 7300, you can transmit characters (and wild card contents) by encasing the string to send (which must be converted from ASCII to HEX) in curly brackets {TEXT TO SEND} like this: RI:FEFE00E017{ RI:FEFE00E017FFFD (Stop xmit) Use these wildcards when programming your RI: commands: <CALL> <SERIAL> <RST>. The RI: is rig agnostic, meaning it will work on any rig that can receive commands. Users of other Icom rigs may have to replace the 00 with the rig ID for their rig and users of other rig manufacturers will use different commands entirely. Consult your rig's manual to see if your rig supports this feature and find the appropriate commands. Here is a PDF of documentation for using the RI: commands with Yaesu rigs.
Note that for RI: commands, the F1 loop function will only work with None or Winkeyer selected. Flex Radio Flex Radio users, please note that you don't need a hardware device to key CW. Tim N9PUZ sent along the following configuration steps: - In the Flex CAT Control application you add a virtual serial port and for the type you choose "Winkeyer" from the menu. It will create a new port and assign it a COM Port number. Close the CAT Control. - In the N3FJP logging program set the CW Transmit up to use a Winkeyer and provide the COM port number from the previous step. - That's it! No Winkeyer or interface needed. The Flex CAT control emulates a Winkeyer. Schematics for Processor Timed CW Hardware Interface W2ENY's USB CW Cable (CW timed by your PC's processor) is a plug and play CW keying device that is designed based on the above optic coupling schematic.
RI:FEFE00E017{CQ TEST}FD
RI:FEFE00E017{<CALL> <SERIAL> MDC}FD
Please Note: Winkeyer provides much more consistent CW timing than processor timed CW in a Windows mulitasking environment, as Winkeyer functions independently of your PC's processor. That said, if you decide to use processor timed CW and would like to make your own interface, below are two schematics for building an interface using the RTS line. Any transmitter that uses a "connect to ground to key" jack can use either of these schematics. Thanks to Bob, N3UR, for providing these schematics!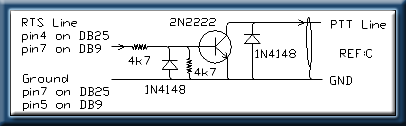
Direct Keying Schematic
(Resistor value is 4.7k)
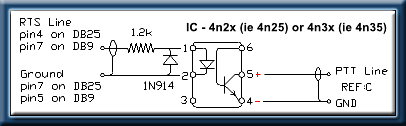
Optic Coupling Schematic
(Electrically separates the computer from the radio.)