
Rig Interface Help
The following is the essential information you'll need to get your rig interface connected, up and running with AC Log and my contesting software.
To get started with rig interface, you'll need the necessary interface hardware to connect your rig to your PC. Many modern rigs now connect directly to your PC with a simple USB cable. Check the CAT control section of your radio's manual for more details.
Here is a video that young Faith Hannah, AE4FH put together, demonstrating how to interface an Icom 7300 with my software:
To interface your rig with my software, once you have the necessary hardware connected between your radio and PC, configure the rig interface form as follows:
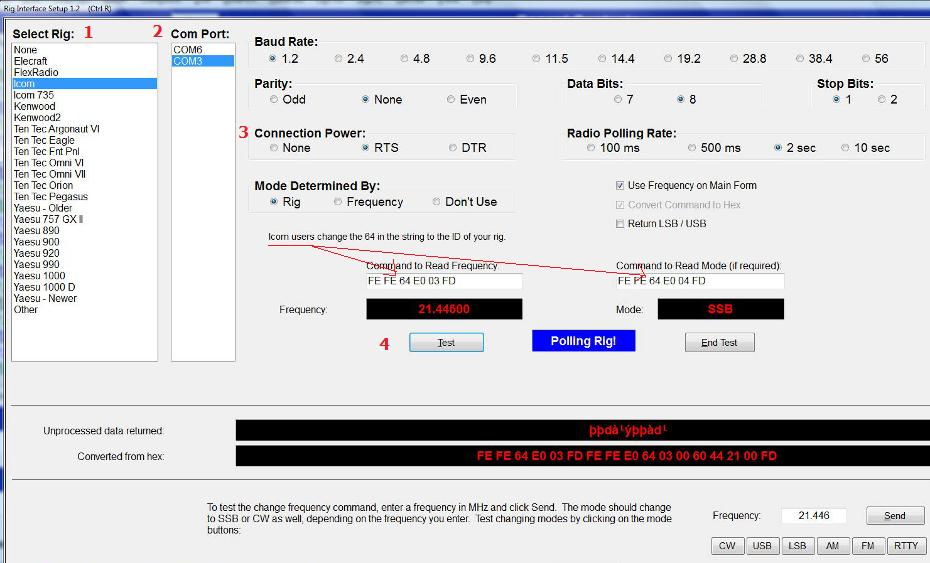
 1. For Select Rig, select the rig you are interfacing. For most rigs, simply selecting the correct rig will also accurately set your baud rate, parity, data bits, stop bits and polling string! You will find the successful settings that users have sent along for the vast majority of rigs we support below.
Icom Users Only! If you select Icom, you will also see text appear, asking you to change the rig ID (64 by default, which happens to be for the 756 Pro II) to the ID for your rig (the red lines in the graphic above). You should be able to find your rig ID in your manual's CAT control section. If there is a small h, such as 64h, ignore it and just enter the two digit number. I've also included all the successful settings I've received from other users below, which include the rig ID.
2. For Com Port, select the com port that you have your rig connected to. Even if only one port is listed, you still have to click on the port to select it.
3. For Connection Power, select the power option, if any, that your interface requires. Most use RTS, some use DTR and some do not require a power option at all.
Ready to Go!
If you have entered your settings correctly, you should be all set to enable rig interface. To give it a try...
4. Click Test to begin polling your rig. If both frequency and mode appear, you are all set! The software will follow your frequency, (and band provided you are in the limits of an Amateur band) and mode. In addition, when you click on a DX spot from the main form, your rig will tune right to that frequency!
Tips!
Once you have rig interface working, click the Save Setting button at the lower left, below the rig list, to save your settings. That way you can instantly load them from any of the other N3FJP Software programs!
If you wish to disable rig interface to log a QSO you made previously on another band, etc., you can either select None from the rig list, or from the main form, simply press Ctrl + Shift + R to temporarily disable rig interface.
When operating digital modes, under the Mode By options, select Mode by Frequency (to return the digital mode based on frequency). Also, if you will be clicking on DX Spots to change frequencies in the digital subband, check the check box that says "Don't send mode change with frequency".
In Case of Difficulty - Don't Panic!
If for some reason you don't get a response from your rig, there are a number of possible causes:
First, make sure that your rig is on and that your rig interface hardware is properly connected to BOTH your radio AND your PC.
Make sure that you have selected the correct Com Port.
Make sure you have selected the correct Connection Power for your interface.
In some cases, certain rigs use settings other than the defaults. Take a look at all the following successful settings sent in by other users below and correct your settings as necessary.
Successful Rig Settings!
The following are working, successful settings that other users were kind enough to send along. Note that the Com Port and power option will depend on your PC and interface, so those two settings may be different than the settings listed below.
If you try these settings for your rig without success, something rig or interface hardware specific is likely at play. Since I only have a Kenwood TS 440s an Icom 756 Pro II and Icom 7610 here, I will not be able to provide further assistance for any other rig or interface. If you are unable to get your rig going after trying the settings below, please feel free to search the message archives on the Users group or post a question there. It's likely that someone with a similar rig and interface will be able to help.
If you have settings for a rig not listed below, I would be very grateful if you would send them along, by clicking the Copy Data to Clipboard button while polling your rig and pasting the contents into an e-mail!
Anan Thetis
Use the Kenwood settings detailed below.
Elecraft K2
Rig Name = Elecraft
Read Frequency Command = FA;
Read Mode Command = MD;
Convert To Hex = False
Baud Rate = 4800
Parity = None
Stop Bits = 2
Data Bits = 8
Power Option = RTS
Elecraft K3
Rig Name = Elecraft
Read Frequency Command = FA;
Read Mode Command = MD;
Convert To Hex = False
Baud Rate = 38400
Parity = None
Stop Bits = 2
Data Bits = 8
Power Option = RTS
Elecraft K3S
Rig Name = Elecraft
Read Frequency Command = FA;
Read Mode Command = MD;
Convert To Hex = False
Baud Rate = 38400
Parity = None
Stop Bits = 1
Data Bits = 8
Power Option = RTS
Elecraft KX2
Rig Name = Elecraft
Read Frequency Command = FA
Read Mode Command = MD
Convert to Hex = False
Baud Rate= 38.4
Parity = None
Stop Bits= 2
Data Bits = 8
Power Option = RTS
Elecraft KX3
Rig Name = Elecraft
Read Frequency Command = FA
Read Mode Command = MD
Convert to Hex = False
Baud Rate= 4.8
Parity = None
Stop Bits= 2
Data Bits = 8
Power Option = RTS
Elecraft K4
Paul KB9AVO writes: Got it Scott .. emulated a Elecraft radio, and the new internal K4 software did the rest .. It picked one of the 2 comports it generates.
Flex Radio (via API)
Rig Name = Flex API
Note, no other settings are required with the Flex API option. With this option, my software will track the active slice.
Flex Radio
Rig Name = FlexRadio
Read Frequency Command = FA;
Read Mode Command = MD;
Convert To Hex = False
Baud Rate = 4800
Parity = None
Stop Bits = 2
Data Bits = 8
Power Option = None
Icom note - All Icom rigs should work with the Icom2 rig name selection. The Icom selection requires the rig to be set to echo back the command (which is the default on many Icoms), but Icom2 will work regardless of the echo back setting.
Icom 703
Rig Name = Icom
Read Frequency Command = FE FE 68 E0 03 FD
Read Mode Command = FE FE 68 E0 04 FD
Convert To Hex = True
Baud Rate = 19200
Parity = None
Stop Bits = 1
Data Bits = 8
Power Option = None
Icom 705
Rig Name = Icom2
Read Frequency Command = FE FE A4 E0 03 FD
Read Mode Command = FE FE A4 E0 04 FD
Convert To Hex = True
Baud Rate = 56000
Parity = None
Stop Bits = 1
Data Bits = 8
Power Option = None
Icom 706
Rig Name = Icom
Read Frequency Command = FE FE 48 E0 03 FD
Read Mode Command = FE FE 48 E0 04 FD
Convert To Hex = True
Baud Rate = 1200
Parity = None
Stop Bits = 1
Data Bits = 8
Power Option = RTS
Icom 706 MK II
Rig Name = Icom
Read Frequency Command = FE FE 4E F0 03 FD
Read Mode Command = FE FE 4E E0 04 FD
Convert To Hex = True
Baud Rate = 19200
Parity = None
Stop Bits = 1
Data Bits = 8
Power Option = RTS
Icom 706 MK II G
Rig Name = Icom
Read Frequency Command = FE FE 58 F0 03 FD
Read Mode Command = FE FE 58 E0 04 FD
Convert To Hex = True
Baud Rate = 9600
Parity = None
Stop Bits = 1
Data Bits = 8
Power Option = RTS
Icom 718
Rig Name = Icom
Read Frequency Command = FE FE 5E E0 03 FD
Read Mode Command = FE FE 5E E0 04 FD
Convert To Hex = True
Baud Rate = 9600
Parity = None
Stop Bits = 1
Data Bits = 8
Power Option = RTS
Icom 728
Rig Name = Icom
Read Frequency Command = FE FE 5E E0 03 FD (another user said 38 was the correct rig ID)
Read Mode Command = FE FE 5E E0 04 FD
Convert To Hex = True
Baud Rate = 19200
Parity = None
Stop Bits = 1
Data Bits = 8
Power Option = DTR
Icom 735
Rig Name = Icom 735
Read Frequency Command = FE FE 04 E0 03 FD
Read Mode Command = FE FE 04 E0 04 FD
Convert To Hex = True
Baud Rate = 9600
Parity = None
Stop Bits = 1
Data Bits = 8
Power Option = None
Note - Icom 735 users report it is particularly important that you use the 9600 baud rate with this radio. You may have to adjust the radio's baud rate by manually removing the cover and changing a jumper in the 735.
Icom 737
Rig Name = Icom
Read Frequency Command = FE FE 3C E0 03 FD
Read Mode Command = FE FE 3C E0 04 FD
Convert To Hex = True
Baud Rate = 1200
Parity = None
Stop Bits = 1
Data Bits = 8
Power Option = RTS
Icom 738
Rig Name = Icom
Read Frequency Command = FE FE 44 E0 03 FD
Read Mode Command = FE FE 44 E0 04 FD
Convert To Hex = True
Baud Rate = 9600
Parity = None
Stop Bits = 1
Data Bits = 8
Power Option = None
Icom 746
Rig Name = Icom
Read Frequency Command = FE FE 57 E0 03 FD
Read Mode Command = FE FE 57 E0 04 FD
Convert To Hex = True
Baud Rate = 19200
Parity = None
Stop Bits = 1
Data Bits = 8
Power Option = RTS
Icom 746 Pro
Rig Name = Icom
Read Frequency Command = FE FE 66 E0 03 FD
Read Mode Command = FE FE 66 E0 04 FD
Convert To Hex = True
Baud Rate = 19200 (another user reported 9600)
Parity = None
Stop Bits = 1
Data Bits = 8
Power Option = DTR
Icom 751A
Rig Name = Icom
Read Frequency Command = FE FE 1C E0 03 FD
Read Mode Command = FE FE 1C E0 04 FD
Convert To Hex = True
Baud Rate = 9600
Parity = None
Stop Bits = 1
Data Bits = 8
Power Option = RTS
Icom 756 Pro
Rig Name = Icom
Read Frequency Command = FE FE 5C E0 03 FD
Read Mode Command = FE FE 5C E0 04 FD
Convert To Hex = True
Baud Rate = 9600 (Note - one user reported success with baud rate of 1200)
Parity = None
Stop Bits = 1
Data Bits = 8
Power Option = RTS
Icom 756 Pro II
Rig Name = Icom
Read Frequency Command = FE FE 64 E0 03 FD
Read Mode Command = FE FE 64 E0 04 FD
Convert To Hex = True
Baud Rate = 1200
Parity = None
Stop Bits = 1
Data Bits = 8
Power Option = RTS
Icom 756 Pro III
Rig Name = Icom
Read Frequency Command = FE FE 6E E0 03 FD
Read Mode Command = FE FE 6E E0 04 FD
Convert To Hex = True
Baud Rate = 19200
Parity = None
Stop Bits = 1
Data Bits = 8
Power Option = None
Icom 765
Rig Name = Icom
Read Frequency Command = FE FE 2C E0 03 FD
Read Mode Command = FE FE 2C E0 04 FD
Convert To Hex = True
Baud Rate = 1200
Parity = None
Stop Bits = 1
Data Bits = 8
Power Option = None
Icom 775
Rig Name = Icom
Read Frequency Command = FE FE 46 E0 03 FD
Read Mode Command = FE FE 46 E0 04 FD
Convert To Hex = True
Baud Rate = 19200
Parity = None
Stop Bits = 1
Data Bits = 8
Power Option = None
Icom 781
Rig Name = Icom
Read Frequency Command = FE FE 26 E0 03 FD
Read Mode Command = FE FE 26 E0 04 FD
Convert To Hex = True
Baud Rate = 1200
Parity = None
Stop Bits = 1
Data Bits = 8
Power Option = None
Icom 821
Rig Name = Icom
Read Frequency Command = FE FE 4C E0 03 FD
Read Mode Command = FE FE 4C E0 04 FD
Convert To Hex = True
Baud Rate = 19200
Parity = None
Stop Bits = 1
Data Bits = 8
Power Option = RTS
Icom 7000
Rig Name = Icom
Read Frequency Command = FE FE 70 E0 03 FD
Read Mode Command = FE FE 70 E0 04 FD
Convert To Hex = True
Baud Rate = 19200
Parity = None
Stop Bits = 1
Data Bits = 8
Power Option = DTR
Icom 7100
Rig Name = Icom
Read Frequency Command = FE FE 88 E0 03 FD
Read Mode Command = FE FE 88 E0 04 FD
Convert To Hex = True
Baud Rate = 19200
Parity = None
Stop Bits = 1
Data Bits = 8
Power Option = RTS
Icom 7200
Rig Name = Icom
Read Frequency Command = FE FE 76 E0 03 FD
Read Mode Command = FE FE 76 E0 04 FD
Convert To Hex = True
Baud Rate = 19200
Parity = None
Stop Bits = 1
Data Bits = 8
Power Option = None
Icom 7300
Rig Name = Icom2
Read Frequency Command = FE FE 94 E0 03 FD
Read Mode Command = FE FE 94 E0 04 FD
Convert To Hex = True
Baud Rate = 9600 (one user reported 56000, another reported 4800, but most reports have been 9600.)
Parity = None
Stop Bits = 1
Data Bits = 8
Power Option = None
Rob, KD9INB reports: "Had to turn the connection power to "Off" in the software setting AND also in the rig, and also had to set the CI-V port in the rig from"Unlinked" to "Linked". Made sure the baud rate setting in the rig and software matched and viola! Works like a charm now."
Icom 7300 MK II
Rig Name = Icom2
Read Frequency Command = FE FE B6 E0 03 FD
Read Mode Command = FE FE B6 E0 04 FD
Convert To Hex = True
Baud Rate = 38400
Parity = None
Stop Bits = 1
Data Bits = 8
Power Option = None
Icom 7410
Rig Name = Icom
Read Frequency Command = FE FE 80 E0 03 FD
Read Mode Command = FE FE 80 E0 04 FD
Note - another user wrote that his 7410 used 3F instead of 80
Convert To Hex = True
Baud Rate = 9600
Parity = None
Stop Bits = 1
Data Bits = 8
Power Option = RTS
Icom 7600
Rig Name = Icom
Read Frequency Command = FE FE 7A E0 03 FD
Read Mode Command = FE FE 7A E0 04 FD
Convert To Hex = True
Baud Rate = 9600
Parity = None
Stop Bits = 1
Data Bits = 8
Power Option = None
Icom 7610
Rig Name = Icom2
Read Frequency Command = FE FE 98 E0 03 FD
Read Mode Command = FE FE 98 E0 04 FD
Convert To Hex = True
Baud Rate = 38400
Parity = None
Stop Bits = 1
Data Bits = 8
Power Option = None
Icom 7700
Read Frequency Command = FE FE 74 E0 03 FD
Read Mode Command = FE FE 74 E0 04 FD
Convert To Hex = True
Baud Rate = 9600
Parity = None
Stop Bits = 1
Data Bits = 8
Power Option = RTS
Icom 7800
Rig Name = Icom
Read Frequency Command = FE FE 6A E0 03 FD
Read Mode Command = FE FE 6A E0 04 FD
Convert To Hex = True
Baud Rate = 9600
Parity = None
Stop Bits = 1
Data Bits = 8
Power Option = RTS
Icom 7851
Rig Name = Icom
Read Frequency Command = FE FE 8E E0 03 FD
Read Mode Command = FE FE 8E E0 04 FD
Convert To Hex = True
Baud Rate = 9600
Parity = None
Stop Bits = 1
Data Bits = 8
Power Option = RTS
David, WB4OZM notes: When one wants to use the USB cable instead of the 3.5mm plug in the remote outlet, I need the CV-V USB Echo Back in the "ON" position. After that all works very well! (Selecting Icom2 should remedy that.)
Icom 9100
Rig Name = Icom
Read Frequency Command = FE FE 7C E0 03 FD
Read Mode Command = FE FE 7C E0 04 FD
Convert To Hex = True
Baud Rate = 9600 (another user reported 19.2 worked for him)
Parity = None
Stop Bits = 1
Data Bits = 8
Power Option = RTS
Icom 9700
Rig Name = Icom2
Read Frequency Command = FE FE A2 E0 03 FD
Read Mode Command = FE FE A2 E0 04 FD
Convert To Hex = True
Baud Rate = 19200
Parity = None
Stop Bits = 1
Data Bits = 8
Power Option = RTS
Note - Kenwood rigs have two options and most will work with either selection, though I recommend Kenwood2. The settings listed below are the ones users just happened to send in. The first setting, Kenwood, always reads the VFO specified (FA; reads VFO A and FB; reads VFO B). Kenwood2 always reads the active VFO. Kenwood2 also sometimes returns a mode when the first setting does not.
Kenwood TS 440s
Rig Name = Kenwood2
Read Frequency Command = IF;
Read Mode Command =
Convert To Hex = False
Baud Rate = 4800
Parity = None
Stop Bits = 2
Data Bits = 8
Power Option = RTS
Kenwood TS 480HX
Rig Name = Kenwood
Read Frequency Command = FA;
Read Mode Command = MD;
Convert To Hex = False
Baud Rate = 9600
Parity = None
Stop Bits = 1
Data Bits = 8
Power Option = RTS
Kenwood TS 570
Rig Name = Kenwood2
Read Frequency Command = IF;
Read Mode Command =
Convert To Hex = False
Baud Rate = 9600
Parity = None
Stop Bits = 1
Data Bits = 8
Power Option = RTS
Kenwood TS 590
Rig Name = Kenwood2
Read Frequency Command = IF;
Read Mode Command =
Convert To Hex = False
Baud Rate = 9600 (some users report 115200)
Parity = None
Stop Bits = 1
Data Bits = 8
Power Option = RTS
Please note that for the Kenwoood 590, users have reported it is necessary to change the rig's default baud rate as one user detailed here on the Users group. In short, he writes "I now set everything to 38.4 – the 2 menu settings that I didn’t know existed (61 and 62) as well as the device manager for the bridge and the software, and waalaa! It works like advertised!" That said, another 590 user reported that his 590 worked fine at 9600 baud. Also, you can enter any baud rate you like by clicking the Other button.
Kenwood TS 870
Rig Name = Kenwood
Read Frequency Command = FA;
Read Mode Command = MD;
Convert To Hex = False
Baud Rate = 9600
Parity = None
Stop Bits = 1
Data Bits = 8
Power Option = RTS
Kenwood TS 890
Rig Name = Kenwood2
Read Frequency Command = IF;
Read Mode Command =
Convert To Hex = False
Baud Rate = 19200 (another user reported 115,200)
Parity = None
Stop Bits = 1
Data Bits = 8
Power Option = None
Kenwood TS 990
Rig Name = Kenwood2
Read Frequency Command = IF;
Read Mode Command =
Convert To Hex = False
Baud Rate = 115,200 (Click Other Button)
Parity = None
Stop Bits = 1
Data Bits = 8
Power Option = RTS
Kenwood TS 2000
Rig Name = Kenwood2
Read Frequency Command = IF;
Read Mode Command =
Convert To Hex = False
Baud Rate = 9600
Parity = None
Stop Bits = 2
Data Bits = 8
Power Option = RTS
Lab599-TX500
Rig Name = Kenwood
Convert To Hex = False
Baud Rate = 9600
Parity = None
Stop Bits = 1
Data Bits = 8
Sun SDR2 DX
Rig Name = Kenwood2
Read Frequency Command = IF;
Read Mode Command =
Convert To Hex = False
Baud Rate = 57600
Parity = None
Stop Bits = 1
Data Bits = 8
Power Option = RTS
Ten Tec Jupiter
Rig Name = Ten Tec Fnt Pnl
Read Frequency Command = 3F 41 0D
Read Mode Command = 3F 4D 0D
Convert To Hex = True
Baud Rate = 56000 (Another user reported 57600)
Parity = None
Stop Bits = 1
Data Bits = 8
Power Option = RTS (Another user reported Both)
Ten Tec Omni VI
Rig Name = Ten Tec Omni VI
Read Frequency Command = FE FE 04 E0 03 FD
Read Mode Command = FE FE 04 E0 04 FD
Convert To Hex = True
Baud Rate = 19200
Parity = None
Stop Bits = 1
Data Bits = 8
Power Option = RTS
Ten Tec Omni VII
Rig Name = Ten Tec Omni VII
Read Frequency Command = ?A
Read Mode Command = ?M
Convert To Hex = True
Baud Rate = 56000
Parity = None
Stop Bits = 1
Data Bits = 8
Power Option = RTS
Ten Tec Orion I
Rig Name = Ten Tec Orion
Read Frequency Command = ?AF
Read Mode Command = ?RMM
Convert To Hex = False
Baud Rate = 56000
Parity = None
Stop Bits = 1
Data Bits = 8
Power Option = RTS
Ten Tec Orion II
Rig Name = Ten Tec Orion
Read Frequency Command = ?AF
Read Mode Command = ?RMM
Convert To Hex = False
Baud Rate = 56000
Parity = None
Stop Bits = 1
Data Bits = 8
Power Option = RTS
Note - Xiegu rigs settings below have been reported successful with Xiegu firmware. Some users have reported problems with other firmware, so if you run into trouble, try Xiegu firmware or contact the third party firmware distributor.
Xiegu G90
Rig Name = Icom2
Read Frequency Command = FE FE 00 E0 03 FD
Read Mode Command = FE FE 00 E0 04 FD
Convert To Hex = True
Baud Rate = 19200
Parity = None
Stop Bits = 1
Data Bits = 8
Power Option = RTS
Xiegu X5105
Rig Name = Icom
Read Frequency Command = FE FE 70 E0 03 FD
Read Mode Command = FE FE 70 E0 04 FD
Convert To Hex = True
Baud Rate = 19200
Parity = None
Stop Bits = 1
Data Bits = 8
Power Option = DTR
Xiegu X6100
Rig Name = Icom
Read Frequency Command = FE FE 70 E0 03 FD
Read Mode Command = FE FE 70 E0 04 FD
Convert To Hex = True
Baud Rate = 19200
Parity = None
Stop Bits = 1
Data Bits = 8
Power Option = DTR
Xiegu X6100 with the Version 1.1.18 Firmware installed
The Rig type has been changed to ICOM2 in ACLOG and the rig address
has been changed from 70 to A4
Rig Name = Icom2
Read Frequency Command = FE FE A4 E0 03 FD
Read Mode Command = FE FE A4 E0 04 FD
Convert To Hex = True
Baud Rate = 19200
Parity = None
Stop Bits = 1
Data Bits = 8
Power Option = DTR
Note - Some newer Yaesu rigs will also support a VS; frequency command, that will return the active VFO.
Yaesu FTX 1
Rig Name = Yaesu - Newer 2
Read Frequency Command = FA; (you can use VS; to return the active VFO)
Read Mode Command = MD0;
Convert To Hex = False
Baud Rate = 115200
Parity = None
Stop Bits = 1
Data Bits = 8
Power Option = RTS
Yaesu 10
Rig Name = Yaesu - Newer 2
Read Frequency Command = FA; (you can use VS; to return the active VFO)
Read Mode Command = MD0;
Convert To Hex = False
Baud Rate = 38400
Parity = None
Stop Bits = 2
Data Bits = 8
Power Option = RTS
Note - one user wrote stating "remind users they have to use the USB B port on the rear of the DX10, not the USB A."
Yaesu 100D
Rig Name = Yaesu 100D
Read Frequency Command = 00 00 00 02 10
Read Mode Command =
Convert To Hex = True
Baud Rate = 19200 (another user reported success using 4800)
Parity = None
Stop Bits = 2
Data Bits = 8
Power Option = None
Yaesu 100MP
Rig Name = Yaesu 991 (That's correct, please use the 991 selection)
Read Frequency Command = FA;
Read Mode Command = MD0;
Convert To Hex = False
Baud Rate = 4800
Parity = None
Stop Bits = 2
Data Bits = 8
Power Option = Both
Yaesu 101D
Rig Name = Yaesu Newer 2
Read Frequency Command = FA; (you can use VS; to return the active VFO)
Read Mode Command = MD0;
Convert To Hex = False
Baud Rate = 9600 (another user reported success with 38.4)
Parity = None
Stop Bits = 2
Data Bits = 8
Power Option = RTS
Yaesu 101MP
Rig Name = Yaesu Newer 2
Read Frequency Command = FA; (you can use VS; to return the active VFO)
Read Mode Command = MD0;
Convert To Hex = False
Baud Rate = 38400
Parity = None
Stop Bits = 2
Data Bits = 8
Power Option = RTS
Yaesu 450D
Rig Name = Yaesu - Newer
Read Frequency Command = FA;
Read Mode Command = MD0;
Convert To Hex = False
Baud Rate = 38400
Parity = None
Stop Bits = 2
Data Bits = 8
Power Option = RTS
Yaesu 710
Rig Name = Yaesu Newer 2
Read Frequency Command = FA; (you can use VS; to return the active VFO)
Read Mode Command = MD0;
Convert To Hex = False
Baud Rate = 38400 (another user reported 4800)
Parity = None
Stop Bits = 2
Data Bits = 8
Power Option = RTS
Yaesu 817
Rig Name = Yaesu - Older
Read Frequency Command = 00 00 00 00 03
Read Mode Command =
Convert To Hex = True
Baud Rate = 38400
Parity = None
Stop Bits = 2
Data Bits = 8
Power Option = RTS
Yaesu 840
Rig Name = Yaesu 890
Read Frequency Command = 00 00 00 02 10
Read Mode Command =
Convert To Hex = True
Baud Rate = 4800
Parity = None
Stop Bits = 2
Data Bits = 8
Power Option = RTS
Yaesu 847
Note - Some, but not all Yaesu 847 users were having trouble interfacing with the new, C#.NET versions of my software. This problem has been corrected in rig interface verion 1.3 and later by sending a command to start cat control when the port is opened if Yaesu - Older is selected. Your 847 must first be turned on before starting rig interface with the software.
Rig Name = Yaesu - Older
Read Frequency Command = 00 00 00 00 03
Read Mode Command =
Convert To Hex = True
Baud Rate = 9600 (one user reported 56000 None / 1/ 8)
Parity = None
Stop Bits = 2
Data Bits = 8
Power Option = RTS
Yaesu 857
Rig Name = Yaesu - Older
Read Frequency Command = 00 00 00 00 03
Read Mode Command =
Convert To Hex = True
Baud Rate = 4800
Parity = None
Stop Bits = 2
Data Bits = 8
Power Option = RTS
Yaesu 890
Rig Name = Yaesu 890
Read Frequency Command = 00 00 00 02 10
Read Mode Command =
Convert To Hex = True
Baud Rate = 4800
Parity = None
Stop Bits = 2
Data Bits = 8
Power Option = RTS
Yaesu 891
Rig Name = Yaesu 891
Read Frequency Command = FA;
Read Mode Command = MD0;
Convert To Hex = False
Baud Rate = 9600 (Another user reported 38,400. If the baud rate doesn't work, go to the FT-891 menu 5-06 (BAUD RATE) then set the baud rate in AC Log to the baud rate shown in the FT-891 menu.)
Parity = None
Stop Bits = 2 (some users report 1)
Data Bits = 8
Power Option = RTS
Additional SSB / CW memory CAT commands courtesy Ray, W8RD: http://w8rd.net/FT-891/ACLog%20extended%20rig%20control.pdf
Yaesu 897
Rig Name = Yaesu - Older
Read Frequency Command = 00 00 00 00 03
Read Mode Command =
Convert To Hex = True
Baud Rate = 4800
Parity = None
Stop Bits = 2
Data Bits = 8
Power Option = RTS
Yaesu 900
Rig Name = Yaesu 900
Read Frequency Command = 00 00 00 02 10
Read Mode Command =
Convert To Hex = True
Baud Rate = 4800
Parity = None
Stop Bits = 1
Data Bits = 8
Power Option = RTS
Yaesu 920
Rig Name = Yaesu 920
Read Frequency Command = 00 00 00 02 10
Read Mode Command =
Convert To Hex = True
Baud Rate = 4800
Parity = None
Stop Bits = 2
Data Bits = 8
Power Option = RTS
Yaesu 950
Rig Name = Yaesu - Newer
Read Frequency Command = FA;
Read Mode Command = MD0;
Convert To Hex = False
Baud Rate = 4800
Parity = None
Stop Bits = 2
Data Bits = 8
Power Option = RTS
Yaesu 991
Rig Name = Yaesu Newer 2
Read Frequency Command = FA;
Read Mode Command = MD0;
Convert To Hex = False
Baud Rate = 9600 (another user reported 38,400)
Parity = None
Stop Bits = 2
Data Bits = 8
Power Option = RTS
Yaesu 991A
Rig Name = Yaesu Newer 2
Read Frequency Command = FA;
Read Mode Command = MD0;
Convert To Hex = False
Baud Rate = 38400 (FT-991A Menu Item 31 Cat Rate 38400bps)
Parity = None
Stop Bits = 2
Data Bits = 8
Power Option = RTS (FT-991A Menu Item 33 Cat RTS Enable)
Polling Rate = 2 sec (FT-991A Menu Item 32 Cat TOT 10msec)
Yaesu 1000
Rig Name = Yaesu 1000
Read Frequency Command = 00 00 00 02 10
Read Mode Command =
Convert To Hex = True
Baud Rate = 4800
Parity = None
Stop Bits = 2
Data Bits = 8
Power Option = RTS
Yaesu 1000 D
Rig Name = Yaesu 1000 D
Read Frequency Command = 00 00 00 02 10
Read Mode Command =
Convert To Hex = True
Baud Rate = 4800
Parity = None
Stop Bits = 2
Data Bits = 8
Power Option = RTS
Yaesu 1000 MP
Rig Name = Yaesu 1000
Read Frequency Command = 00 00 00 02 10
Read Mode Command =
Convert To Hex = True
Baud Rate = 4800
Parity = None
Stop Bits = 2
Data Bits = 8
Power Option = RTS
Yaesu 1200
Rig Name = Yaesu - Newer
Read Frequency Command = FA;
Read Mode Command = MD0;
Convert To Hex = False
Baud Rate = 38400 (some users report 4800 also works)
Parity = None
Stop Bits = 2
Data Bits = 8
Power Option = RTS
Yaesu 2000
Rig Name = Yaesu - Newer
Read Frequency Command = FA;
Read Mode Command = MD0;
Convert To Hex = False
Baud Rate = 38400
Parity = None
Stop Bits = 2
Data Bits = 8
Power Option = RTS
Yaesu 3000
Rig Name = Yaesu - Newer
Read Frequency Command = FA; (you can use VS; to return the active VFO)
Read Mode Command = MD0;
Convert To Hex = False
Baud Rate = 38400
Parity = None
Stop Bits = 2
Data Bits = 8
Power Option = RTS
A user reported the following codes can be used in the phone F key set up form for firing the Yaesu 3000 rig voice memories:
RI:PB01;
RI:PB02;
RI:PB03;
RI:PB04;
RI:PB05;
Yaesu 5000
Rig Name = Yaesu - Newer
Read Frequency Command = FA;
Read Mode Command = MD0;
Convert To Hex = False
Baud Rate = 38400
Parity = None
Stop Bits = 2
Data Bits = 8
Power Option = RTS
Yaesu 9000
Rig Name = Yaesu - Newer
Read Frequency Command = FA;
Read Mode Command = MD0;
Convert To Hex = False
Baud Rate = 19200
Parity = None
Stop Bits = 2
Data Bits = 8
Power Option = RTS
Yaesu Mark V
Rig Name = Yaesu 1000
Read Frequency Command = 00 00 00 02 10
Read Mode Command =
Convert To Hex = True
Baud Rate = 4800
Parity = None
Stop Bits = 2
Data Bits = 8
Power Option = RTS
![]()
Copyright 1997-2026, N3FJP Software - Affirmatech, Inc