
N3FJP Software Help Information
(System Example Shown - MS Windows Win 7)
Settings Menu Options
This Help page lists the Settings Menu Options for Amateur Contact Log.
 Settings > Setup
Selecting Settings > Setup displays the form as seen in the Setup graphic below. It will vary depending on the contest and provide the opportunity to enter any required exchange data for a particular contest. The "Common" fields contain information that is common to all the N3FJP amateur radio programs. The "Optional" fields are User's choice for input.
The "Always Display Setup" is disabled by Default in AC Log and enabled with the contesting software. You may check this box to enable the display upon start up. Click Done to return to the program.
For longitude, please enter western values (like the USA) positively and eastern values negatively.

Setup
Clicking the "Help" command button at the bottom will give you the screen below for information on Zones, latitude, longitude, bearing and distance.

Settings > List Matches for These Fields with Tab
When you tab from fields in AC Log, you can optionally set the software to list any previous matches with the value in the field that you are just leaving. That way, you will know instantly if you have worked that entity before.
Selecting from the menu options Settings > List Matches for These Fields with Tab displays the form as seen in the graphic below. Check the fields which you would like the list to update with matches. Keep in mind that if you have a large log and many matches, it may take some time to load the list.

List Matches with Tab Select
Settings > New Contact and QSL Alert Options
As you are entering a contact or a station is spotted on Telnet, you can know instantly if you have worked and or confirmed the station or entity previously.
Selecting Settings > New Contact and QSL Alert Options gives the following options in the menu as shown in the graphic below. You can choose which alert criteria you would like to alert when making a contact, or you can choose to turn off the alert function.

Menu Options New Contact and QSL Alert
Larry, W1DYJ was kind enough to put together this PDF document to explain this function and how it effects the incoming DX spots that AC Log displays.
Settings > Edit Fields Displayed, Position and Tab Order
With Amateur Contact Log, you can customize the appearance and data entry fields that appear on the main form any way that you like! Select Settings > Edit Fields Displayed, Position and Tab Order to display the form below.
You may use this form to customize the data entry fields on the main form. This includes enabling the fields you want to see as well as changing their position and tab order. The actual sizes of the fields are a set. Height and width and cannot be changed.
To change the tab order, select the control you wish to adjust and then use the Up and Down buttons at the upper left of the form. The tab order on the main form will be in the same order as this form's control list. Disabled fields are skipped when tabbing from the main form, so it is not necessary to move all the disabled controls to the bottom of this list. Just be sure that all the enabled controls are in the order you want, as you plan to tab through them on the main form.
This function does not change the order or visibility of the main list columns. To change your main list columns, just drag the columns to the position you want with your mouse.

Edit Fields Displayed
After clicking the check box below entitled 'Enable Repositioning of All Fields on Main Form', you may drag any data field. Hold down the left mouse button to drag the field that you clicked on to an empty space on the form.
To make a control visible or invisible, click on the control in the list and then check or uncheck 'Visible on Main Form'. You will see the controls appear and disappear on the main form as you make your selections. Invisible controls will be identified as Disabled on this form's list.
To fine tune the control location, Right Click on the control and use the arrow keys that appear as seen in the graphic below.

Fine-tune Field Position
After you are finished with positioning the fields and the tab order, please remember to uncheck the enable positioning box on the Edit Fields Displayed form.

Remember to uncheck the enable positioning!
Here is a step by step tutorial:
Settings > Other Field Titles and Fill Behavior
Selecting Settings > Other Field Titles and Fill Behavior displays the form as seen in the graphic below. With this form you can assign names to the Other fields you would like to include on AC Log's main form. You can also assign a default value with the options on this form.
Depending on what the field is being used for in your log, you may want it to default to the value of the previous record, the value entered during a prior contact with the same station, or you may not want a default value at all.
Also, the name you choose for the field will be used as an ADIF import / export tag so if you want to import data to AC Log that includes fields that aren’t in AC Log’s default list, be sure to enter the correct ADIF tag here before importing, and the data will be imported.

Other Titles
Settings > Date Options
Selecting Settings > Date Options displays the form as seen in the graphic below. This form is used to choose your preferred date option. We strongly recommend that you choose either the YYYY/MM/DD or your Windows Regional Settings format so that Windows and AC Log properly understand each other. Otherwise, you may wind up with invalid dates, unexpected sort behavior, etc.

Date Options Form
Settings > Appearance
Selecting Settings > Appearance from AC Log's menu will display the options as shown in the graphic below.

Menu Options for Appearance
Settings > Appearance > Form Size
Selecting Form Size from the Appearance menu options above will display the form in the graphic below. Our software will display at full screen size by default, but you can set it to use less of your screen if you like. Enter a value less than 100 for the percentage of the screen that you would like to use. Depending on your resolution, values below 70 may not display well.

Form Size Setting
Settings > Appearance > Colors and Fonts
Selecting Colors and Fonts from the Appearance menu options above will display the various forms in the graphics below. You can use this form to specify the colors and fonts you would like to display on the main form. The color and font selection form that appears in the contesting software is slightly different than AC Log, but they both function similarly.

Color and Font Selection
Select the colors and fonts you prefer to customize the appearance of the main form any way that you like. The same selection form is used in all the contesting software, but the section worked and remaining colors are only applicable to contests with section multipliers.

Choosing a color

Displaying color change
Please note that when you enable DX Spotting, all the controls and their associated fonts will shrink down to accommodate the additional form area that the DX spotting display will require. You may want to select slightly larger fonts in anticipation of the resizing requirements for DX spotting.

Choosing a font

Displaying font change
Settings > Appearance > Main List Size on Form
Selecting Main List Size on Form from the Appearance menu options will display the form in the graphic below. Use this option to set how much of the main form that you would like the main listing of all your contacts to consume.
If you plan to make more data entry text boxes visible on the main form, reduce the size of the main list by entering a smaller number to give yourself a larger area to work with.

Change Main List Size on Form
Settings > Appearance > Main List Grid Lines
Selecting Main List Grid Lines from the Appearance menu will toggle the grid line display on or off.
Please note that the color and size of the grid lines aren’t customizable so if you are having trouble seeing them, a great solution is to choose an alternating back color on the form that displays when you click Settings > Appearance > Colors and Fonts as shown in the graphic below.

Alternate Backcolor with Default
Settings > Appearance > Main List Frequency Format
Selecting Main List Frequency Format from the Appearance menu will display the form in the graphic below. This form allows you specify how many decimal places appear on the main list. If you enter a frequency, it should always be recorded as a numeric value in Megahertz. The value you enter in your frequency text box will be saved in your log.

Frequency Format
Settings > Transmit > CW Setup
Please see this page for all the details on setting up and using CW with our software.
Settings > Transmit > Phone Setup
To use the audio feature, first record and save your audio files. You can use the Windows recorder by clicking Start > Programs > Accessories > Entertainment > Sound Recorder. You must have Windows Media Player installed to use this function (Windows Media Player is already installed on most operating systems). You can record in any audio format that Windows Media Player is capable of playing.

Phone Setup
Once you have recorded your audio files, you can set up the audio within AC Log by selecting from the menu options Settings > Transmit > Phone Setup. The form in the graphic above will appear. Click the Browse button beside each F key text box on the phone setup form and select a file to associate it with the F key. After you select a file for F1, click the Test button and it should play (and continue to loop if you have a loop value greater than 0). You can only play the F1 file from the CW setup form, but you can play them all from the main form, simply by pressing the associated F key. On the main form, you MUST be in phone mode for the audio functions to work.
Connect the line-out of your sound card to the audio input of your transceiver. Be VERY CAREFUL to start with your sound card's audio output on the lowest setting. GRADUALLY increase the sound card's output while playing a wave file until your transceiver responds appropriately.
CAUTION! Overdriving your radio will cause a poor transmitted signal at best and the potential for PERMANENT DAMAGE TO YOUR RADIO! If you connect directly to the mic input of your radio, an interface may be required to prevent overdriving and/or damage.
When playing your audio wave files, you can key your transmitter manually, use VOX, or an interface connected to your PC's serial port. To use the serial port, please select a valid port and select whether you want to use the RTS or DTR line to key your radio. You can use the same port that you have selected for sending CW since you won't be doing both simultaneously, but it must be a different port from other functions such as rig interface.
Each wave file corresponds to a function key. Select the wave file you would like to associate with the function key. From the main logging page, press the appropriate function key each time you wish to play a wave file.
Esc from the main form will stop the wave file. In addition, pressing any key will stop the wave file associated with the F1 key.
This video created by Richard, K0PIR demonstrates setting up and using phone audio wave files running Windows 10.
With version 1.1, I have added the ability to play saved phone memories stored in your rig (for rigs equipped with this feature). To send a command to your rig instead of sending the string, precede the text with RI:. For example, when placed in an F key string, the following will trigger the Icom 7300 and Icom 7610 internally recorded voice messages: (you must have rig interface enabled and be connected by a com port).
Stop xmit RI:FEFE00E0280000FD
Play mem 1 RI:FEFE00E0280001FD
Play mem 2 RI:FEFE00E0280002FD (and so on...)
Settings > Transmit > Select Mode
Selecting Settings > Transmit > Select Mode as shown in the graphic below allows you to select the transmit mode.

Select Mode Menu options
In the contesting software, since you select an operating mode, the software knows whether to associate the F keys with your CW setup or phone set up. Since you may switch to either at any time in AC Log, use this function to assign your F key settings to CW or phone.
Settings > Rig Interface
Selecting Settings > Rig Interface will display the form in the graphic below.

Rig Interface Setup
My software will read the frequency and mode from most common rigs. In addition, when you click on a DX spot, most rigs will tune right to the spot frequency! For all the details on setting up rig interface, please visit the following link:
http://www.n3fjp.com/help/righelp.html
Settings > DX Spotting > Configure
Selecting Settings > DX Spotting > Configure will display the form in the graphic below. On the DX spotting form, to enable Telnet DX spotting, enter your call sign in the login field above and then click the check box to enable DX spotting. Change the size of the list on the main form by adjusting the percentage above.

DX Spotting Setup
The fields displayed on the main form of the contesting software include (there are a few others on AC Log and you can easily determine what they are by clicking Settings > DX Spotting > Display Column Headers):
- Call sign of the station spotted
- Frequency
- Country (retrieved from a lookup to the country list based on the call sign)
- Status (if a needed spot where applicable)
- Call sign of the spotting station and any comments
- Prefix (retrieved from a lookup to the country list based on the call sign)
- Time from the telnet host spot post
- Continent (retrieved from a lookup to the country list based on the call sign)
- Bearing (calculated from your Long and Lat to the country list Long and Lat)
- Distance (calculated from your Long and Lat to the country list Long and Lat)
Please note that the bearing and distance will be most useful for DX as there are often only one set of coordinates for each country in the country list.
Connecting to a telnet host should be very easy. If you have any trouble, make sure your Internet and Virus Protection Software are allowing this program to access the Internet. In addition to dxspots.com on port 23, there are many telnet DX spotting host options available. If you would like to try others, just Google dx spotting sites. Note that you can filter which continents you would like to see on the main form above, which can be very useful for contests such as November Sweepstakes and other contests that are largely continent specific.
Since many telnet hosts only allow one connection per IP, I've added a feature to enable you to see DX spots on all the PCs on your LAN at once! If you are set up with multiple clients, just connect to the telnet host with one client. On the other client(s), select LAN Relay as your data source from the option buttons above. If you have enabled the network status functions (Settings > Network) on all the PCs on your LAN, you will see DX spots relayed from the PC connected to the telnet host to all your other clients as well! In this configuration, only the server PC connected to the telnet host can post DX spots out to the Internet.
Once you have DX Spoitting configured, from the main logging form, press Ctrl E to display the band map. Please see this Band Map Tutorial to learn more.
This video details setting up DX Spotting.
Settings > DX Spotting > Display DX Column Headers
Selecting Settings > DX Spotting > Display DX Column Headers, as seen in the graphic below, will toggle the DX list column header display on an off. Presently, this is only available in AC Log.

DX Spotting Configure menu
Settings > DX Spotting > Spot DX On Entry
Settings > DX Spotting > Spot DX On Entry menu option, as seen in the graphic above, when DX Spotting is enabled, and this option is selected, any stations worked outside of your country will be immediately spotted when you enter them in your log. Please be sure to disable this option if you enter older contacts at a later date.
Settings > Network
Selecting Settings > Network will display the form in the graphic below. All of our software is fully networkable! For all the details, please visit the following link:
http://www.n3fjp.com/help/networkinghelp.html

Network Status Display
Settings > Voice Navigation
I have received several requests to provide support for visually impaired hams, and I would like to do whatever I can. Kimberly and I have provided voice location on the main form for many of the fields. Selecting Settings > Voice Navigation from the menu options displays the Voice Navigation form as seen in the graphic below. This form provides information detailing where to save the audio wave files, which is PC dependent (the blocked portion in the graphic is relative to our own PC). After you copy the necessary wave files and enable voice navigation, as each data entry field receives the focus, an audio wave file with Kimberly’s voice will identify the field.

Voice Navigation
In addition, I have been working extensively with Kelvin Marsh, M0AID, who was a tremendous help in making Amateur Contact Log and the contesting software more accessible for visually impaired hams. Kelvin has put together a review and audio demo of Amateur Contact Log. You'll find Kelvin's review here:
http://active-elements.org/2013/09/08/accessibility-review-of-amateur-contact-log-4-2/
His audio MP3 overview here:
http://kelvinsite.files.wordpress.com/2013/09/aclog-overview.mp3
Settings > Fill Fields When Tabbing from Call
There are two basic approaches for logging a contact in AC Log. You can either tab into each field and have the default values fill as they receive focus, or you may prefer to have all the fields fill immediately as you tab from the call field. If you would like the defaults to immediately fill, simply enable this option. This option is especially useful for DXpeditions and special events, where most of the data remains consistent from one contact to the next.

Fill Fields Menu Option
Settings > Carry Comments Data Forward
If you would like the comments that you entered to automatically fill the Comments text box when you work the station again, enable this option.
Settings > Refresh Rate
Selecting Settings > Refresh Rate will display the form in the graphic below. This setting is only pertinent if you are networking and logging with multiple PCs simultaneously using the File Share method. The faster you set the refresh rate, the more often the program will check to see if the file count has increased and load the additional contact(s) if needed. However, there is overhead and increased network traffic associated with the refresh rate so if you notice a lag on your PC or you experience network connectivity problems, have all the PCs reduce their refresh rate.

Refresh Rate form
You’ll find lots more networking details by clicking the link below:
http://www.n3fjp.com/help/networkinghelp.html
Settings > RST Settings and Defaults
Selecting from the menu option graphic as seen below will allow you to turn your RST defaults on or off, set default values and enable the option to skip right over the RST fields in the tab order if you prefer.

RS(T) Settings and Defaults Menu
Selecting Set CW, Phone or Digital Default RST will produce one of the following forms as seen in the graphic below for the CW option. Use this form to set the default as you prefer.

RS(T) Default form for CW
Settings > Reset Columns to Defaults
If you have made changes to your column order or widths and would like to restore them to the default settings, you can click Settings > Reset Columns to Defaults > Widths to reset the width and Settings > Reset Columns to Defaults > Order to reset the order as seen in the graphic below. If you have shrunk a column down to a zero width and now can’t find it, resetting the widths is the remedy.

Reset Columns menu option
Settings > Time Off – If Blank, Log Current Time
You can toggle this setting by this menu option, as seen below, or by the check box above the Time Off field if displayed. When enabled, if you leave the Time Off field blank, the current time will be logged when you enter the contact. As an aside, the Time On field will always be set to the current time on entry if left blank.

Time Off menu option

Time Off Check Enabled(if Time Off entry is enabled on main form)
Settings > Check for New Announcements on Startup
Please keep this function enabled! With AC Log versions prior to 4.0, as developments occurred such as new LoTW server settings, a new QRZ call book lookup url, etc., I always communicated that quickly on my e-mail announcements list, but many folks invariably miss the e-mail or aren’t subscribed to my e-mail list at all. Then, for the next few weeks, as users encounter problems, I’m flooded with thousands of e-mail questions!
Adding this function in the new versions of AC Log provides a quick and easy way to receive important information about new enhancements, new releases, required settings changes for other services such as LoTW and any other important developments that will enable you to continue to enjoy Amateur Contact Log to the fullest!
Settings > Super Check Partial
The Super Check Partial database contains call signs of active contesters. You'll find lots more details here.
The idea is that as you start to type a call, all the similar calls of active contesters are displayed, which can help you to determine the call you are trying to work. The search is performed as you type the call, provided the field is longer than one character.
With Super check partial enabled, the possible dupes display will also list super check partial calls, in addition to the possible duplicates. Possible duplicates will display first with a White font and Red back color, followed by the super check partials with a Black font and Gray back color.
Alternatively, you can display the results in a floating form that you can position and resize to your preference. Click the floating form option to use the floating form instead of the possible duplicates control.
You can filter the super check partial calls by continent as selected on this form. This is handy for seeing applicable calls for DX vs state side contests.
The 'Any Portion' option on the Possible Duplicates label will affect how both the possible duplicate and super check partial calls are filtered.
The database used is master.scp. You only need to download the file once for all my software to access it. When you download the file, it is saved to your shared directory.
Any similar database will work, provided it is ASCII formatted and contains one call sign per line.
Settings > History File
First, here's a bit of back story, since I've modified my position on this request. Over the years, I received many requests to add the ability to use a history file to prefill contest data, gleaned from exchanges you've had in previous contests. For a long time I had been reluctant to implement this feature, believing that the exchange should actually be copied at least once during each contest. The following are the most common alternative viewpoints users sent along that successfully, to a degree, changed my position:
- Even though the data is prefilled, the operator still has to copy the exchange to make sure the data is correct for this contest, since this time the station you are working may be in a different category, etc. The only benefit is saving the effort of typing. The entire exchange still must be heard and understood, so the spirit of the contest is preserved and there is no ethical violation in using historical data.
- ARRL, CQ and other organizations don't explicitly exclude using historical data to prefill, so it is permissible under the current rule set. N3FJP isn't the rule governing body and therefore it is inappropriate for N3FJP to impose additional restrictions that aren't addressed in the rules.
- Most other contesting programs provide a prefill feature. Adding this feature will put me on equal contest footing with operators using other software alternatives.
- I'm looking forward to handing out QSOs in this contest, but I am not going to submit my log for a contest score, so any rules governing history file usage won't apply to my circumstance.
Though history files have been commonly used in many contesting programs for some time, most rule sets are silent on the use of history files. In casual conversations with various contest sponsors, some governing bodies encourage their use while others lean towards opposition.
Personally, I feel that using DX Spotting provides a much greater competitive advantage than using historical data does, but that historical data is enough of an advantage that anyone using it should be required to submit in the Assisted category (whether they use DX Spotting or not), but that's just my opinion. As has been rightly pointed out, since I am not part of a rules governing body, that's not my call. As far as I know, you can currently use history files in any category.
Like DX Spotting, which is generic in all my software, but only allowable in certain contests and categories, the history file feature is disabled by default. You can choose to use your history file or not, as you or the contest rules deem appropriate.
Implementation
Each time you open an applicable contest program, a shared file named ContestHistory.txt is read. As always, when you tab from the Call field, the software will first check to see if you have worked the same station on another band during this contest and fill the pertinent exchange fields. If you enabled the use of the history file (Settings > History File) and you have not worked the station during this contest, the software will check the history file and fill any fields for which it finds data.
REMEMBER, HISTORY VALUES MAY REQUIRE EDITING! The operator may be using a different exchange this time, so don't log the QSO unless you accurately hear and record the entire exchange!
When you close the current contest program, the following happens:
- Fields with current values are updated.
- Calls new to the history file are added.
- Calls for which there have not been any updates for more than 5 years are removed.
- The file is saved.
This history file is updated automatically when you close the software, so you build and maintain your history file simply by using each N3FJP Software contest program. If, for example, a state or section is exchanged in one program, it will be available in the next, even if you are using the second program with the history file feature for the first time. The file is shared among all applicable programs and resides in your N3FJP Shared folder (File > Show File Locations).
Note that some contests, like CQ World Wide for example, don't receive any added exchange data benefit from the history file, simply because it isn't necessary. All the exchange data in CQ WW is already gleaned from the call sign. Still, I've added the history file feature in all the contesting software for consistency. It also provides the opportunity to see the name of the person you are working, regardless of contest, if the name is part of your history file.
Settings > Web Upload Contest Status
I added this FTP status upload feature with Field Day in mind and that is how the following description is written, but when users heard that I was working on this feature for Field Day, I started getting requests to add it to all the programs, including AC Log! Using this status upload feature, clubs can see what their club station running AC Log is doing from home, club members can track their club's progress of all supported contests, DXPeditions can post where they are operating, recent contacts, etc., and you can upload your activity as well!
Have you ever had to leave your Field Day site and wonder how your group was doing while you were away? Maybe you'd like to listen along from home, but you can't find the frequency they are running? Perhaps you are headed up to the site and are wondering if there is anything they need that you could bring along? This feature, first coded in July of 2014, is designed to answer those questions!
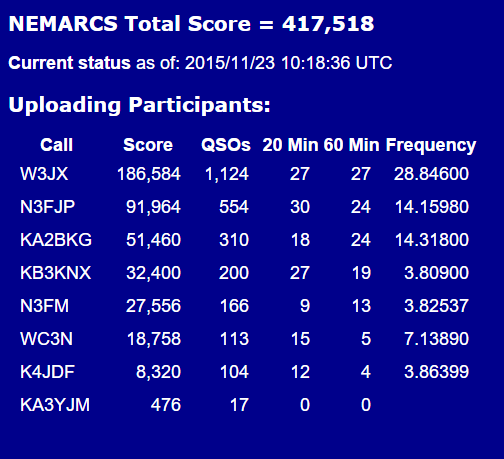
The concept is simple. Every three minutes (or whatever interval you set), this software will FTP upload your current score statistics, a brief message and your most recent contacts (including frequency if known) to your web hosting site. Simply give the URL to your group members so that they can check via the Internet. This is an excellent way for club members to keep tabs on how it's going and any needs that may develop at your Field Day site while they are away. You can see an example by navigating your browser to:
http://www.n3fjp.com/fd/fdstatus.html
This isn't designed with viewing from the general public in mind, but rather a quick status update on the Internet for club members to be able to follow along from home. The HTML coding is minimal, with an emphasis on keeping the ASCII file upload to be as small as possible. The web page may be accessible on the Internet to anyone, but it is likely that only folks you provide the URL to will be able to find your data, so view this primarily as an internal communications tool for your group.
To enable the web upload, you will need:
- Internet connectivity at your Field Day site.
- A web hosting service such as GoDaddy, etc. that accepts FTP uploads.
- A valid URL that you have permission to upload to.
- A valid password for your hosting site.
After completing the form (depending on your hosting, all fields including the path and file name may be case sensitive), click Upload Now. If successful, a very basic web page with your data will be accessible with your Internet browser at the URL you specified.
Check that this function is working properly by clicking the Upload Now button on this form. Any errors will be displayed when called here, but they will not be displayed when uploading from the main form. That way, if Internet access is temporarily down, etc., you can continue logging for the contest without distraction.
Note, you may have to create the directory on your website with your website publishing tool before this software is able to upload this status file to the directory if the directory doesn't already exist.
If your website host uses a different port than 21 for your uploads, include the port in your URL. For example, if your are uploading your file to a directory named fd and your site uses port 7200, instead of this:
ftp://yoursite.com/fd/
Format it like this:
ftp://yoursite.com:7200/fd/
Also, some hosts require public_html in the upload path, along the lines of this: ftp://yoursite.com/public_html/fd/
If you've never published a web page before, don't start here. Instead, using an FTP program, publish a test page to your web hosting space manually so that you can figure out all of your upload settings more easily. Once you have the settings working in your FTP program and you've verified you are successfully able to upload files to your hosting space, you can transfer your settings here. I'm not able to extend support to include teaching folks how to set up hosting sites and upload files, but you can Google the process for more details.
During the brainstorming process for this feature, some groups who don't have Internet at their Field Day site requested I also code a text file that could be transmitted by packet, so I have created that as well. Of course, you will have to configure your packet software to attach the file to a message and send it automatically every few minutes.
Note that with the Web Upload Contest Status feature enabled, you can now use my free Club Score Processor to keep a running, real time total for all the stations in your club!
Settings > Application Program Interface (API)
This API provides a way for other programs to connect with my software, write data to N3FJP Software text boxes, read data from text boxes and call functions like Enter, Dupe check, etc. If you have a program that you would like to see interfaced with my software, please contact the developer now and refer them to this page! http://www.n3fjp.com/help/api.html
The typical configuration is to set my software as the Server and allow other programs to connect. From my software's menu options click Settings > API and check the upper checkbox that says TCP API Enabled (Server). Leave the lower Client checkbox unchecked.
The API functionality also enables N3FJP programs to communicate with each other to perform entity confirmation status checks, rig interface via API and sending CW via API! In this scenario, the typical configuration is to set AC Log as the server and set the contesting software as clients:
From Amateur Contact Log, click Settings > API and check the upper checkbox that says TCP API Enabled (Server). Leave the lower Client checkbox unchecked.
In the contest software, check the lower checkbox to Enable Entity Confirmation Check via API. Leave the upper Server checkbox unchecked.
Just enter a call in the contest software's Call field for an unconfirmed entity in AC Log and press the space bar to tab. When you tab from the Call field in the contesting program, a status query will go out to AC Log via API to check the confirmation status and the result will be displayed in the contesting software's dialogue box!

If you are running AC Log 5.5, your only alert will be unconfirmed on band and mode. If you are running AC Log 5.6 or later, the alert options that will appear in the contest software include:
Entity is an All Time New One
Entity isn't confirmed on any band or mode
Entity is confirmed, but hasn't been worked on current band and mode
Entity is confirmed, but is unconfirmed on current band and mode
There won't be a message if the entity is confirmed on the current band and mode.
Enabling the API also gives you the ability to set up rig interface and / or send CW via API, which eliminates com port sharing problems among multiple programs. Often, when I have Amateur Contact Log open to hunt DX, there might also be one or more contests that I want to dabble in as well (state QSO parties for example), but since Windows won't let programs share a com port, simultaneous rig interface and sending CW from multiple programs used to be tough.
Now, using the API in the latest versions, you can set up one program (usually Amateur Contact Log) as the server, connect AC Log directly to your rig interface and / or CW interface as always and then let any other N3FJP Software programs access your rig and CW interface as well, for simultaneous operation!
Settings > Register
If you didn’t register the software when you started the program, you can register it from this menu item. Please note that once you have registered the software, if you proceed with this menu option, the software will be set to an unregistered state until you again enter the registration information that we sent you.
You may also use this form if you have received a new call sign and wish to update the program. Please be sure you have already contacted us for a NEW password for your NEW call sign before proceeding. Your old password will not work with your NEW call sign.

Registration Warning form
![]()
Copyright 1997-2025, N3FJP Software - Affirmatech, Inc